Quick Start
This tutorial builds a “Hello World” approval workflow. One person submits a message, another approves it, and when approved, the message is sent.
We assume you’ve completed the main quick start and have a helloworld Django
app ready.
First, add viewflow.workflow to your settings:
INSTALLED_APPS = [
    ...
    'viewflow',
    'viewflow.workflow',
    'helloworld',
]
Define the Model
The process model stores the state of each workflow instance. Open
helloworld/models.py:
from django.db import models
from viewflow import jsonstore
from viewflow.workflow.models import Process


class HelloWorldProcess(Process):
    text = jsonstore.CharField(max_length=150)
    approved = jsonstore.BooleanField(default=False)

    class Meta:
        proxy = True
The base Process model has a data JSONField. The jsonstore package
exposes parts of that JSON as regular Django fields. This lets you use them in
forms and admin.
Proxy models work well here because they don’t require extra database joins.
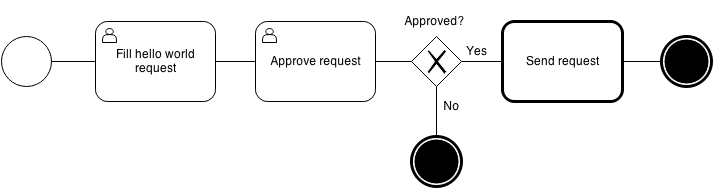
Define the Flow
The flow maps the BPMN diagram to Python code. Each node is a class attribute.
Create helloworld/flows.py:
from viewflow import this
from viewflow.workflow import flow, lock, act
from viewflow.workflow.flow import views

from .models import HelloWorldProcess


class HelloWorldFlow(flow.Flow):
    process_class = HelloWorldProcess

    start = (
        flow.Start(views.CreateProcessView.as_view(fields=["text"]))
        .Annotation(title="New message")
        .Permission(auto_create=True)
        .Next(this.approve)
    )

    approve = (
        flow.View(views.UpdateProcessView.as_view(fields=["approved"]))
        .Permission(auto_create=True)
        .Next(this.check_approve)
    )

    check_approve = (
        flow.If(act.process.approved)
        .Then(this.send)
        .Else(this.end)
    )

    send = (
        flow.Function(this.send_hello_world_request)
        .Next(this.end)
    )

    end = flow.End()

    def send_hello_world_request(self, activation):
        print(activation.process.text)
What each node does:
flow.Start- A user fills a form to start the processflow.View- A user task on an existing processflow.If- A decision point that checks a conditionflow.Function- Runs Python code synchronouslyflow.End- Marks the process as complete
The this object creates references to other nodes before they’re defined.
Expose the Flow
Add the flow to your URL configuration. Open demo/urls.py:
from django.urls import path
from viewflow.contrib.auth import AuthViewset
from viewflow.urls import Application, Site, ModelViewset
from viewflow.workflow.flow import FlowAppViewset
from helloworld.flows import HelloWorldFlow


site = Site(title="ACME Corp", viewsets=[
    Application(
        title='Sample App', icon='people', app_name='sample', viewsets=[
            FlowAppViewset(HelloWorldFlow, icon="assignment"),
        ]
    ),
])

urlpatterns = [
    path('accounts/', AuthViewset(with_profile_view=False).urls),
    path('', site.urls),
]
FlowAppViewset creates URLs for:
- Starting new processes
- Executing tasks
- Viewing process details
- Inbox, Queue, and Archive list views
Run the App
Create and apply migrations:
./manage.py makemigrations helloworld
./manage.py migrate
Start the server:
./manage.py runserver
Open http://127.0.0.1:8000 and try the workflow.